Intro
Now you can use any model that is hosted on an endpoint to be able to generate synthetic data.
Let's go through a walk-through.
Pre-requisites
In order to get started, you'll need the following:
- A Neosync account which you can sign up for free here
- Access to an LLM hosted at an endpoint. I'll be using OpenAI but you can use any other LLM as long as it's available at a REST endpoint.
- A database to store your data. I'm going to use Neon but either Postgres or Mysql works.
Setting up our database
For this guide, I'm going to use a Postgres database from Neon.
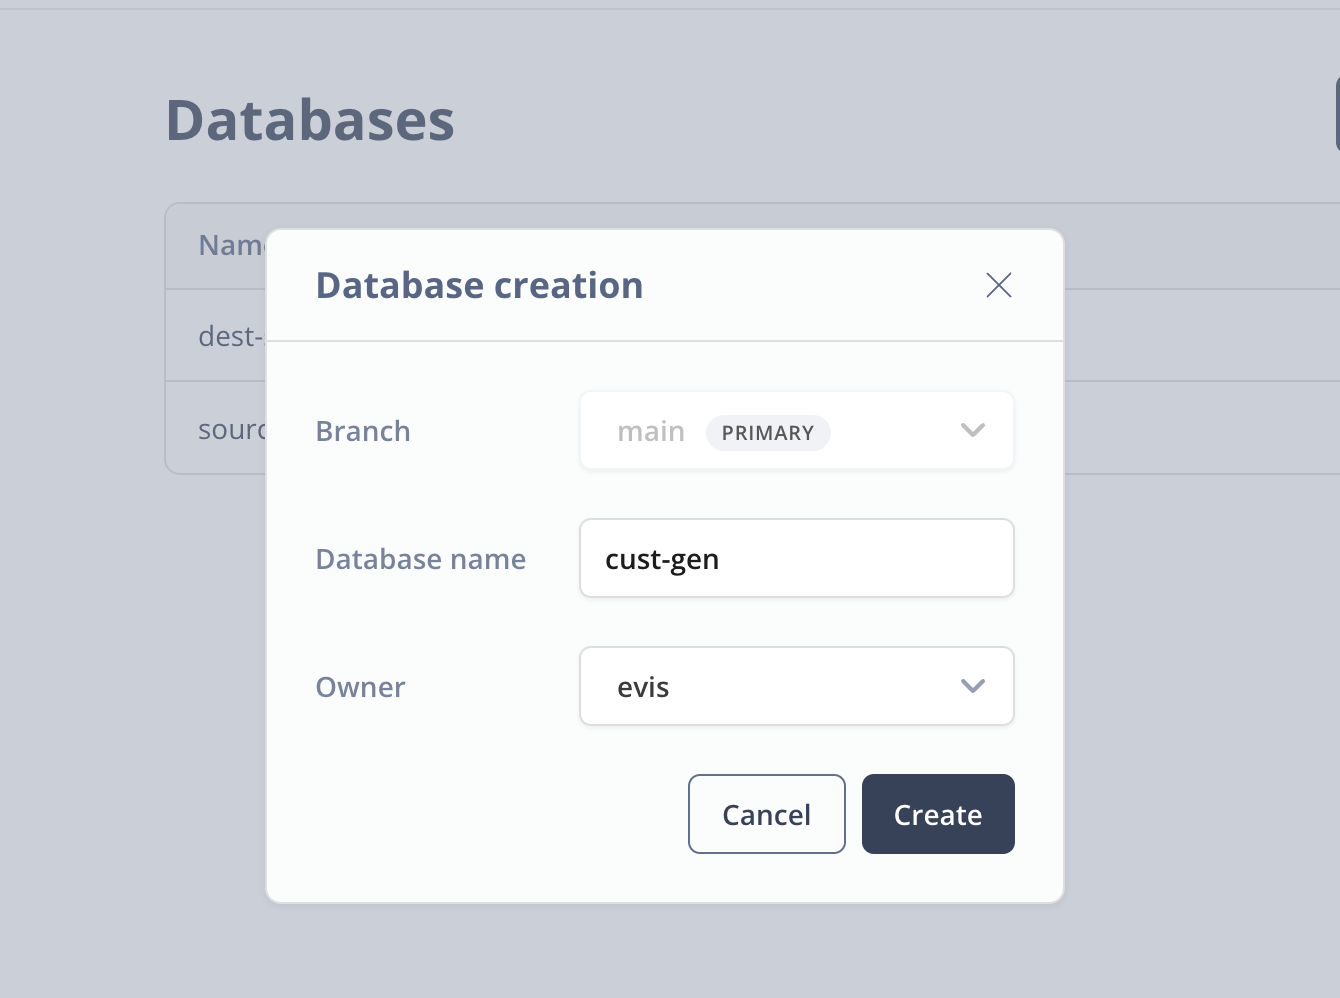
Click on Databases on the left hand menu and click on the New Database button to create a new database. I've named my database cust-gen and picked the evis role as the owner. This is just an admin role that I'm using for this demo.
Next go to the SQL Editor in Neon and let's create our database schema. First, make sure that you have the cust-gen database selected and then paste the following SQL into the editor window and click Run.
CREATE TABLE candidates (
    id UUID PRIMARY KEY,
    first_name VARCHAR(255),
    last_name VARCHAR(255),
    email VARCHAR(255) UNIQUE,
    interview text
);
When the query successfully runs, you should see the following:
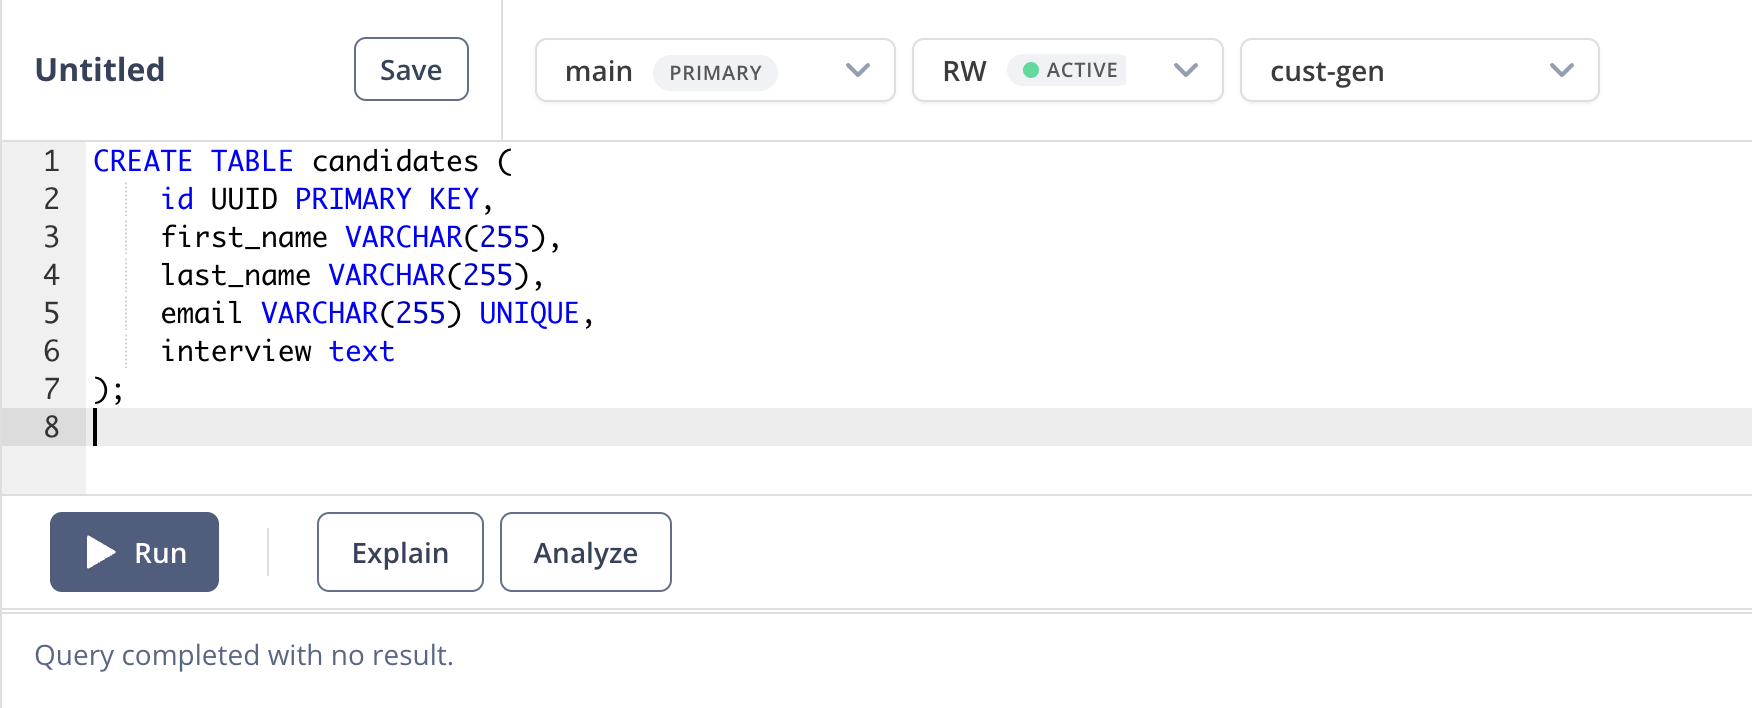
Nice! DB set up is complete.
Last thing we'll need to do is to just get the connection URL that we'll use to connect to our database. Go to Dashboard and select the cust-gen DB and click on the copy button to copy the connection URL.
Hang on to this for a minute and we can move onto setting up Neosync.
Creating a Connection
Now that we have our database set up, we can connect Neosync to it.
To get started here, login to your Neosync account and click on Connections -> + New Connection -> Neon.
Let's name our connection cust-gen-db and then in the Connection URL field, paste in the connection string we copied earlier. Click on Test Connection to see validate your connection. You should see a modal pop up like so:
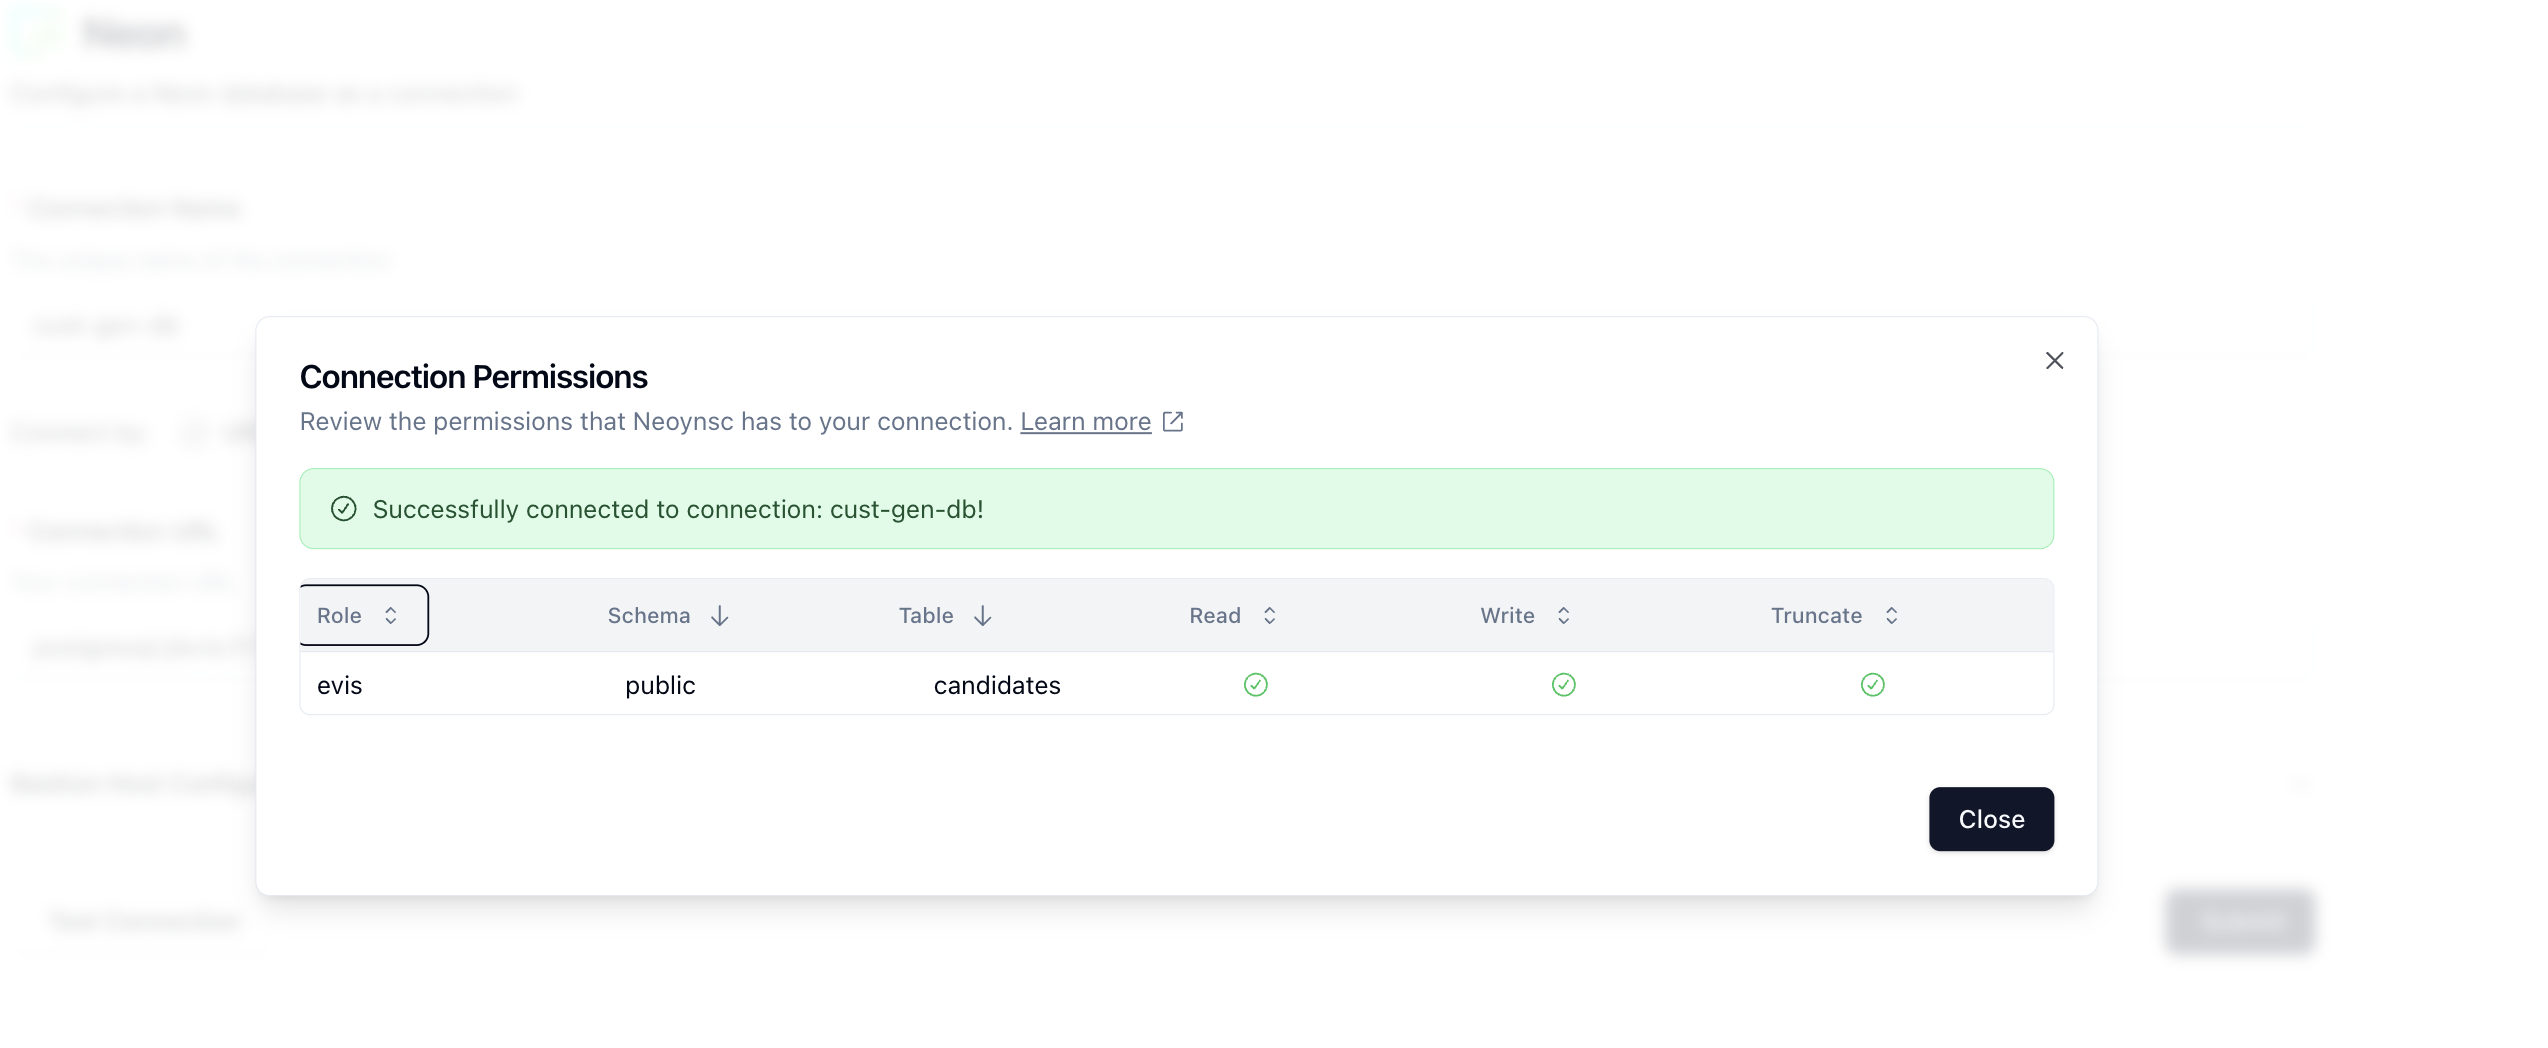
Nice! Looks like we can see our database and table and that our permissions are correct. Click on Close and then Submit to save the connection.
Creating a Connection to our LLM
Next, we need to create a connection to our LLM provider. click on Connections -> + New Connection -> OpenAI. We support any LLM that uses the OpenAI interface.
Fill in you Connection Name, model endpoint and then the API key.
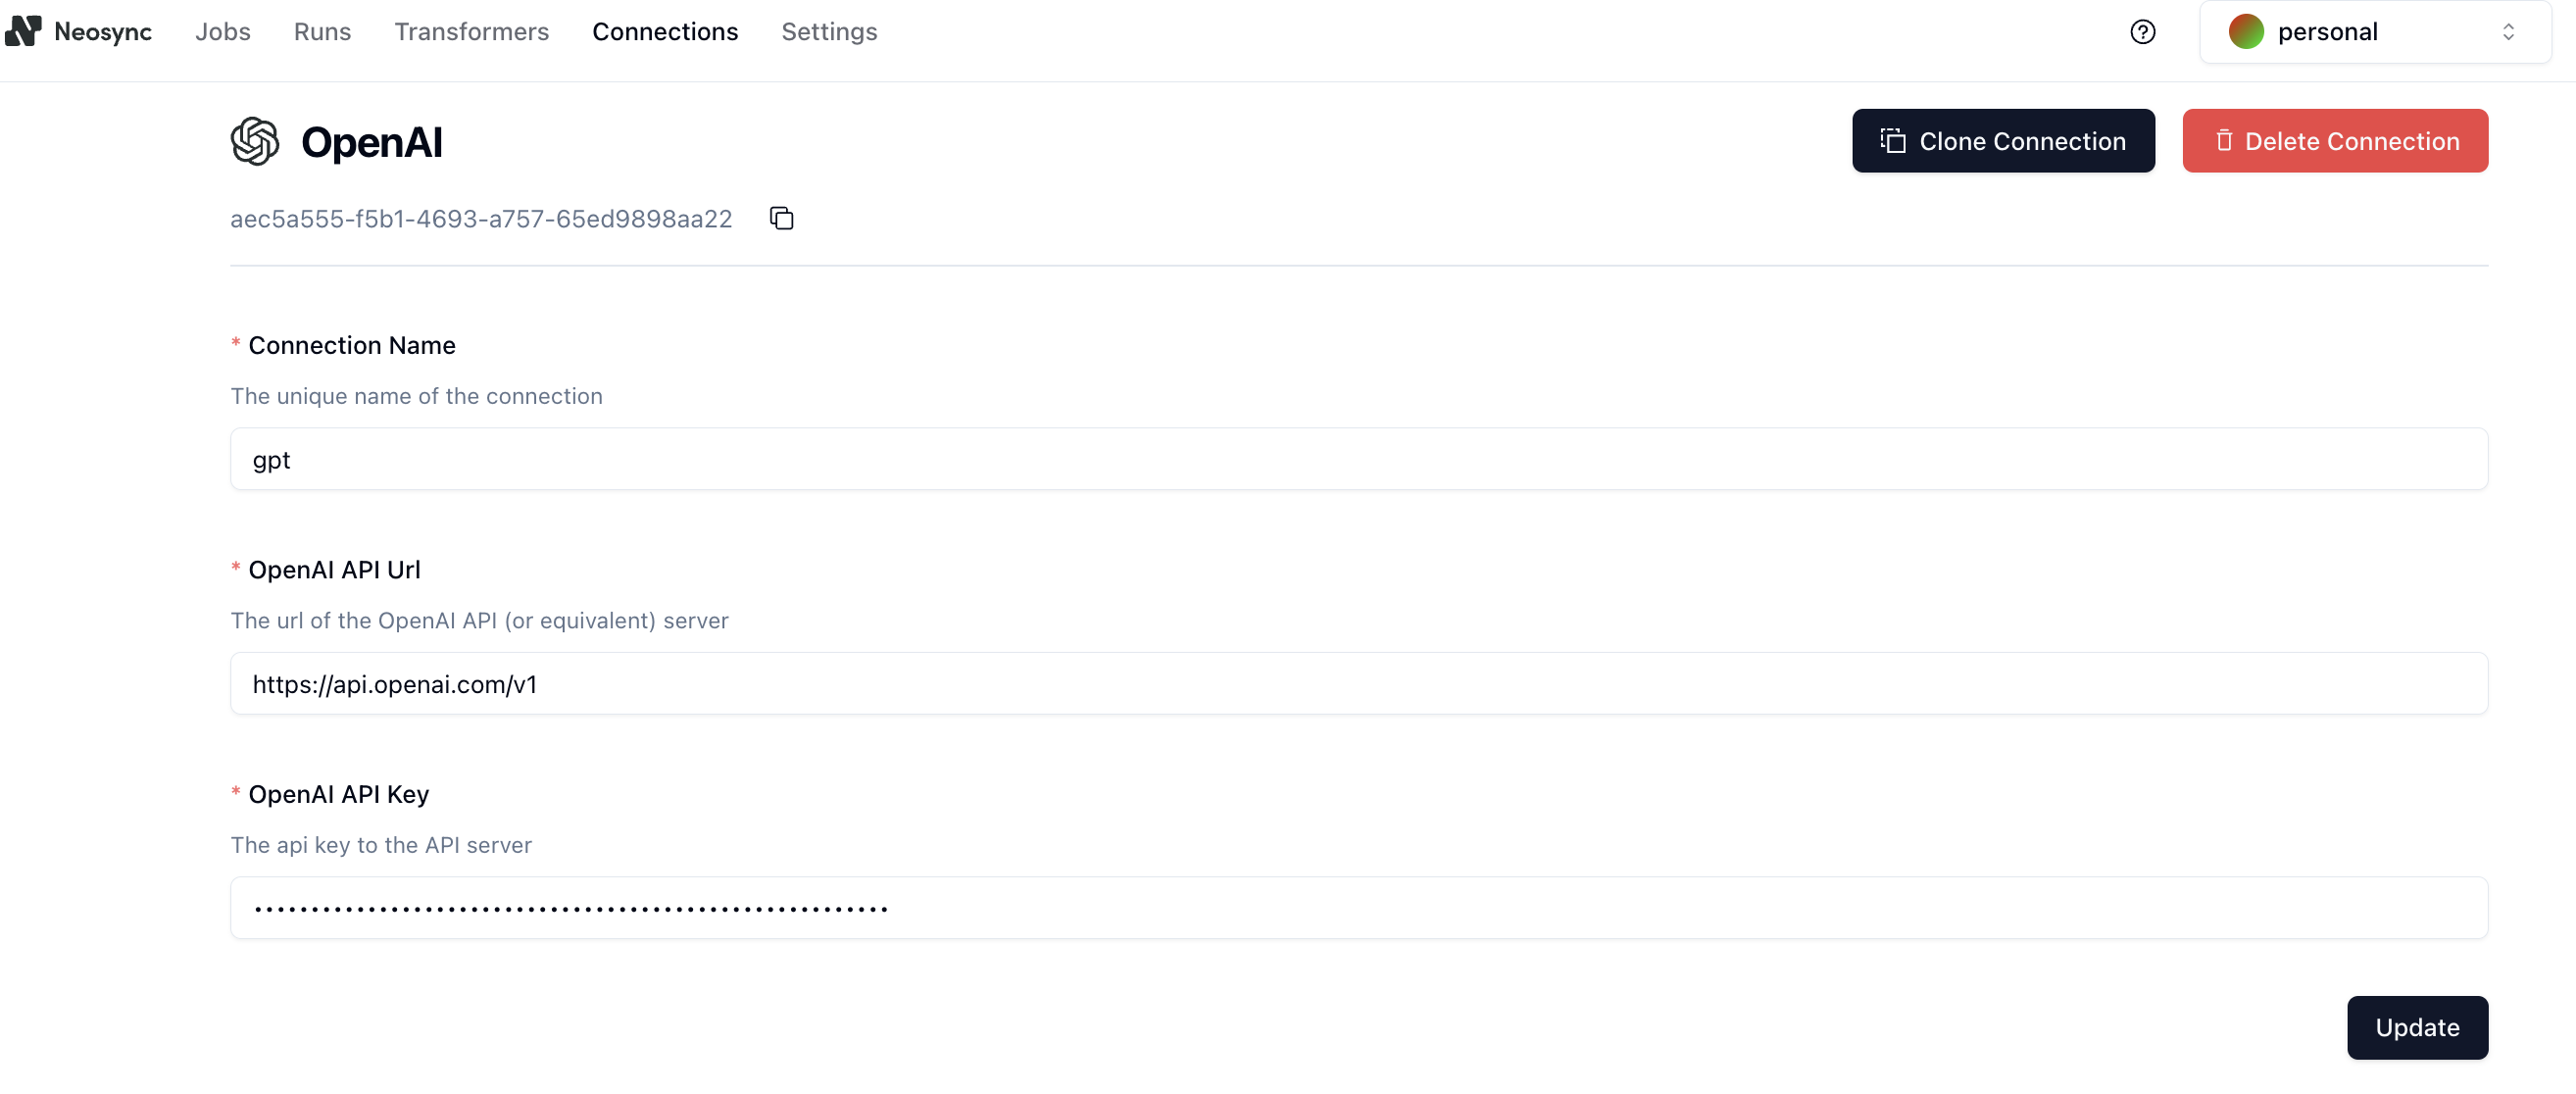
Click on Submit to save the connection.
Creating a Job
Jobs are how we configure and execute workflows to run and generate data or anonymize existing data. Click on Jobs in the top navigation menu and then click on the + New Job button. Select the AI Data Generation job type and click Next.
You'll land on the Define page where we can start to define our job.
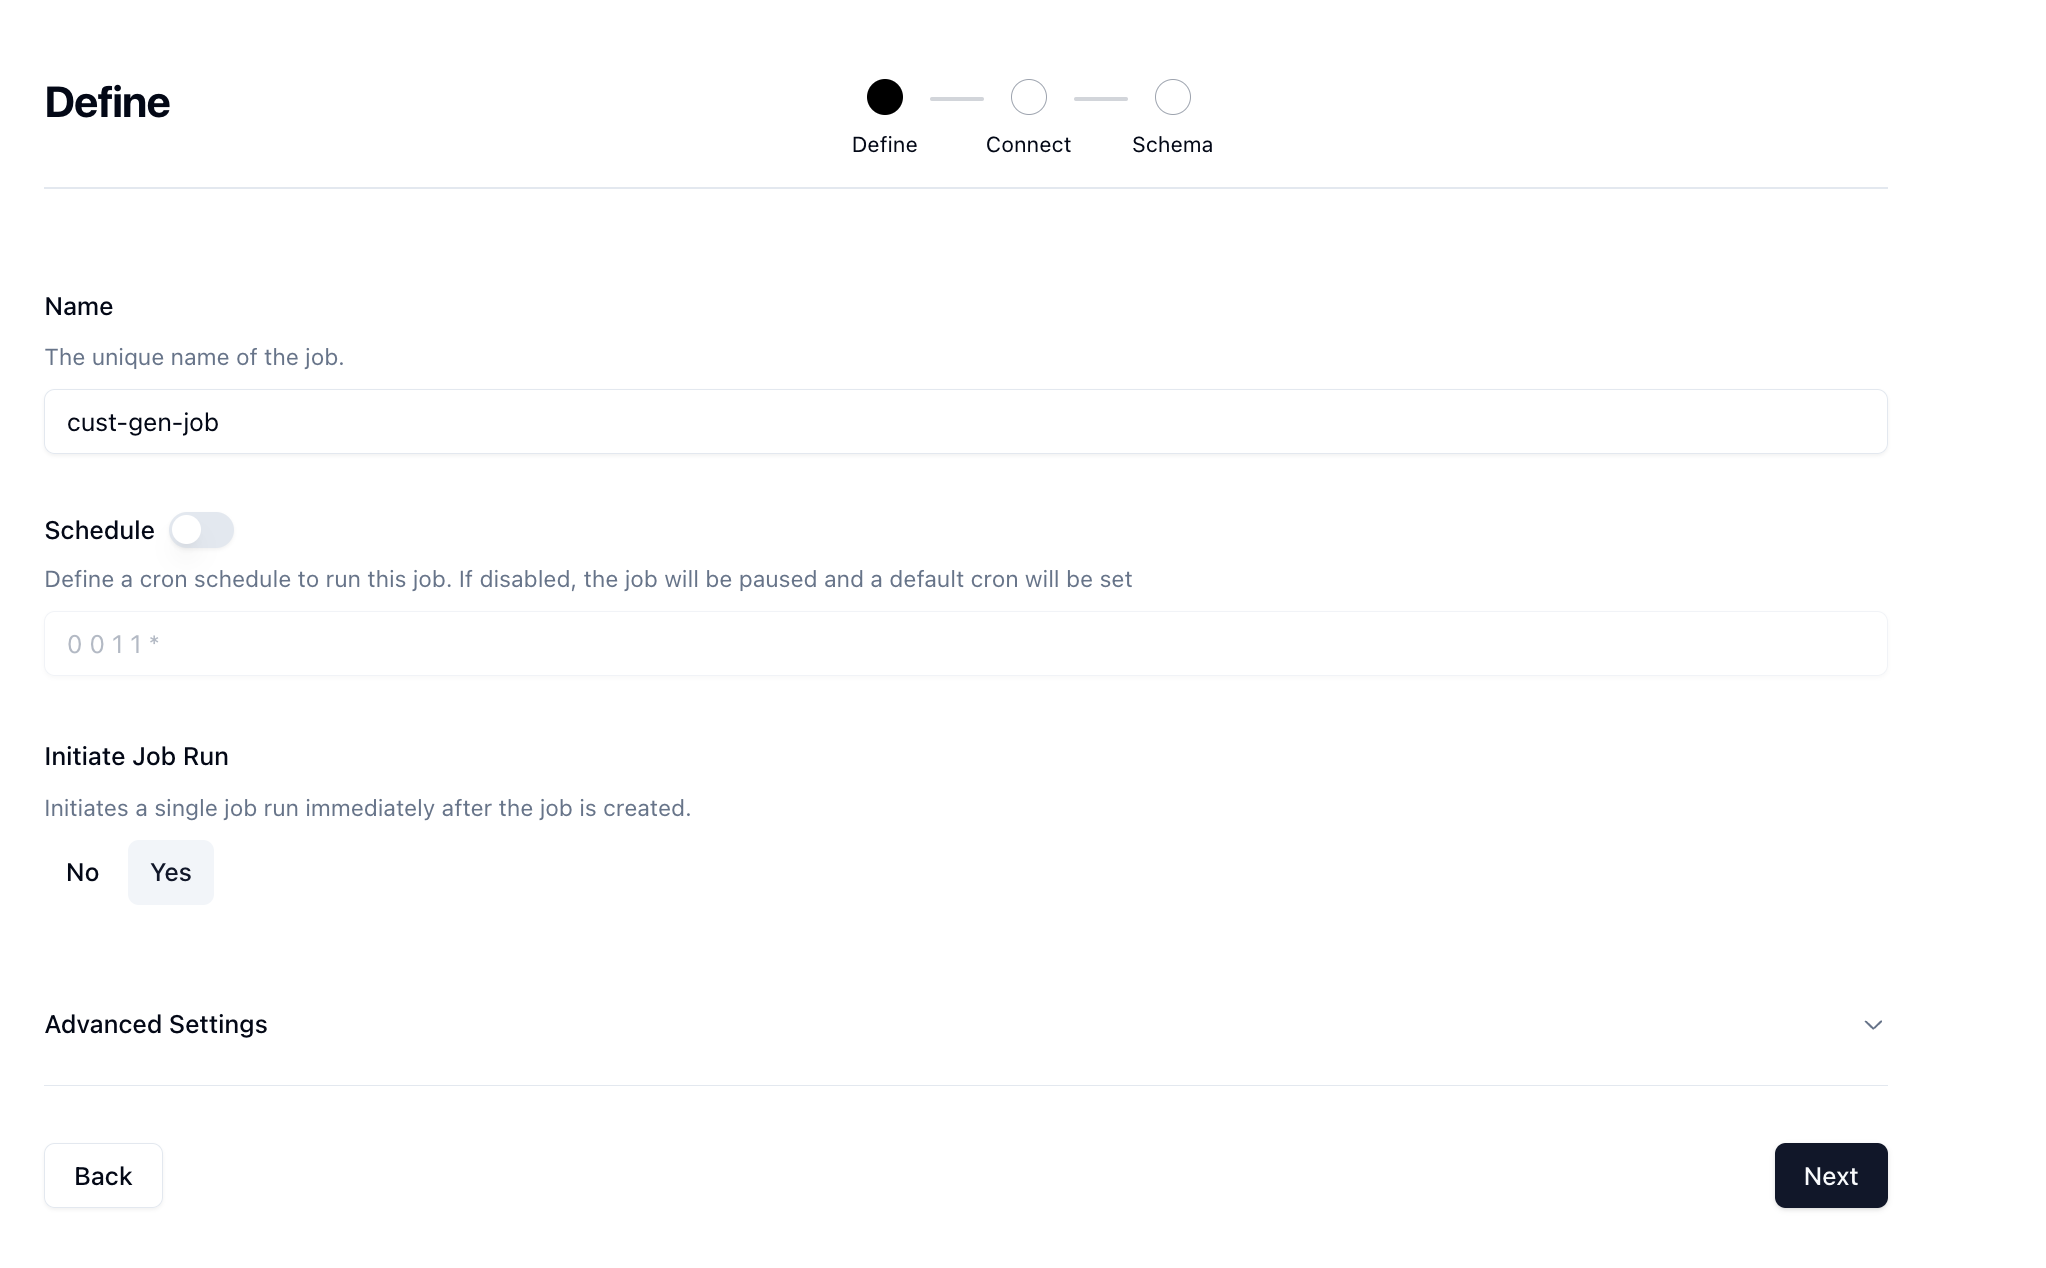
Give your job a name and then if you want to run it on a schedule you can, however we're just going to manually trigger. Set the Initiate Job Run option to Yes and then click Next.
Next, you'll be taken to the Connect page where you can select the connection we previously created.
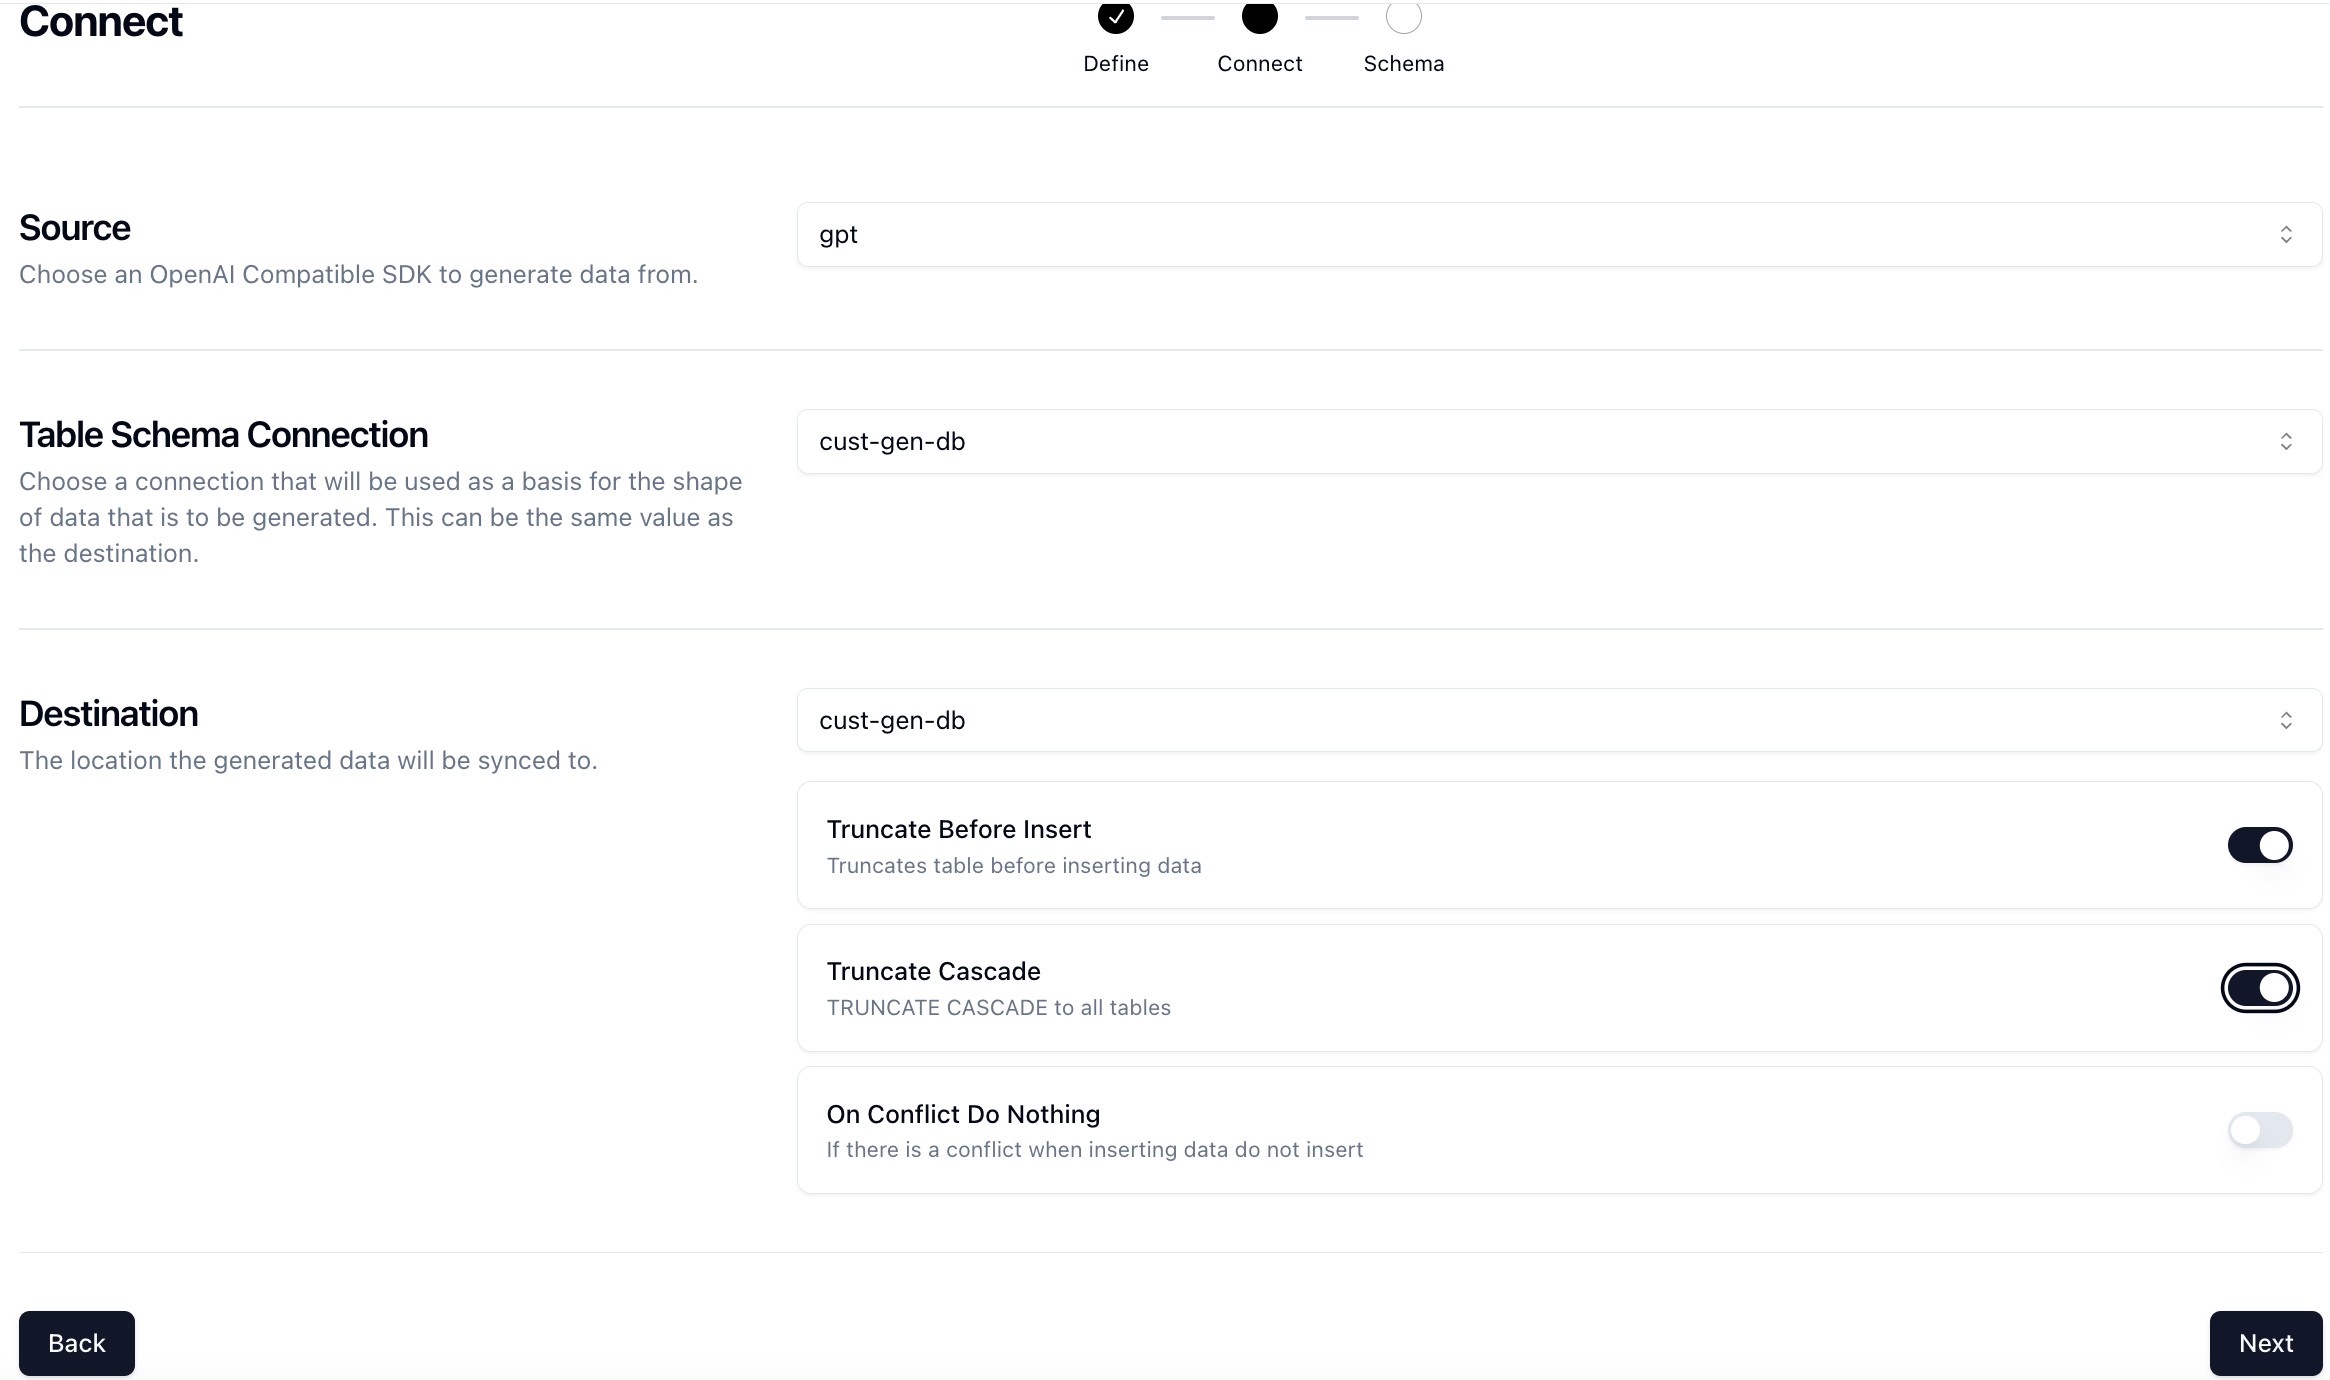
Select the cust-gen-db connection and set the Truncate Before Insert option to true. This will give us a fresh slate every time we want to run the job and clear out any existing data.
Click Next for the last step.
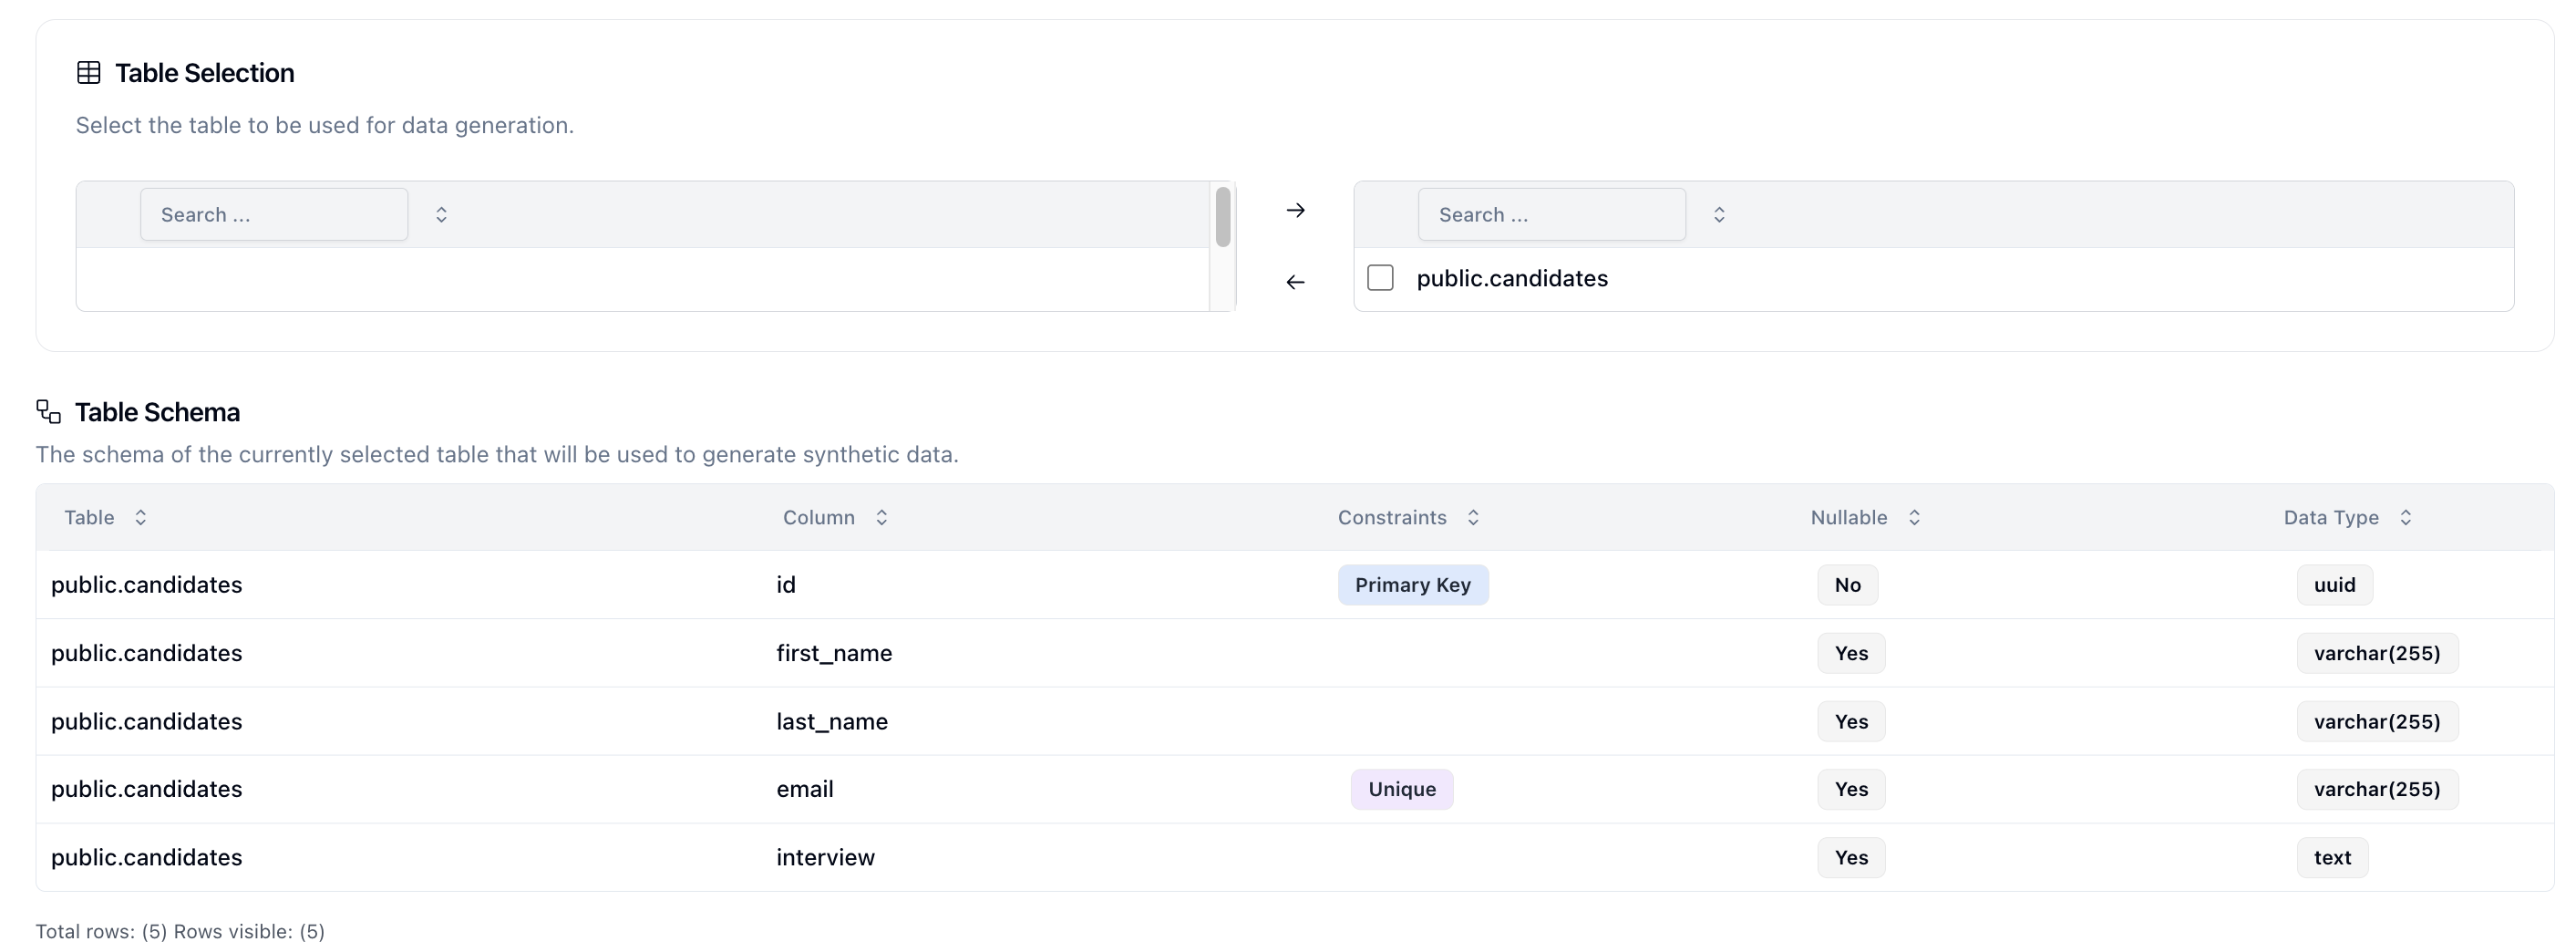
The Schema page is where you configure your schema.
First, let's select the public.candidates table and click on the right arrow to bring it over to the destination. This should automatically fill in the Table Schema table with the schema.
Next select the model that you want to use. We provide some common model names but you can use any model name that your connection supports.
Now for the fun part!
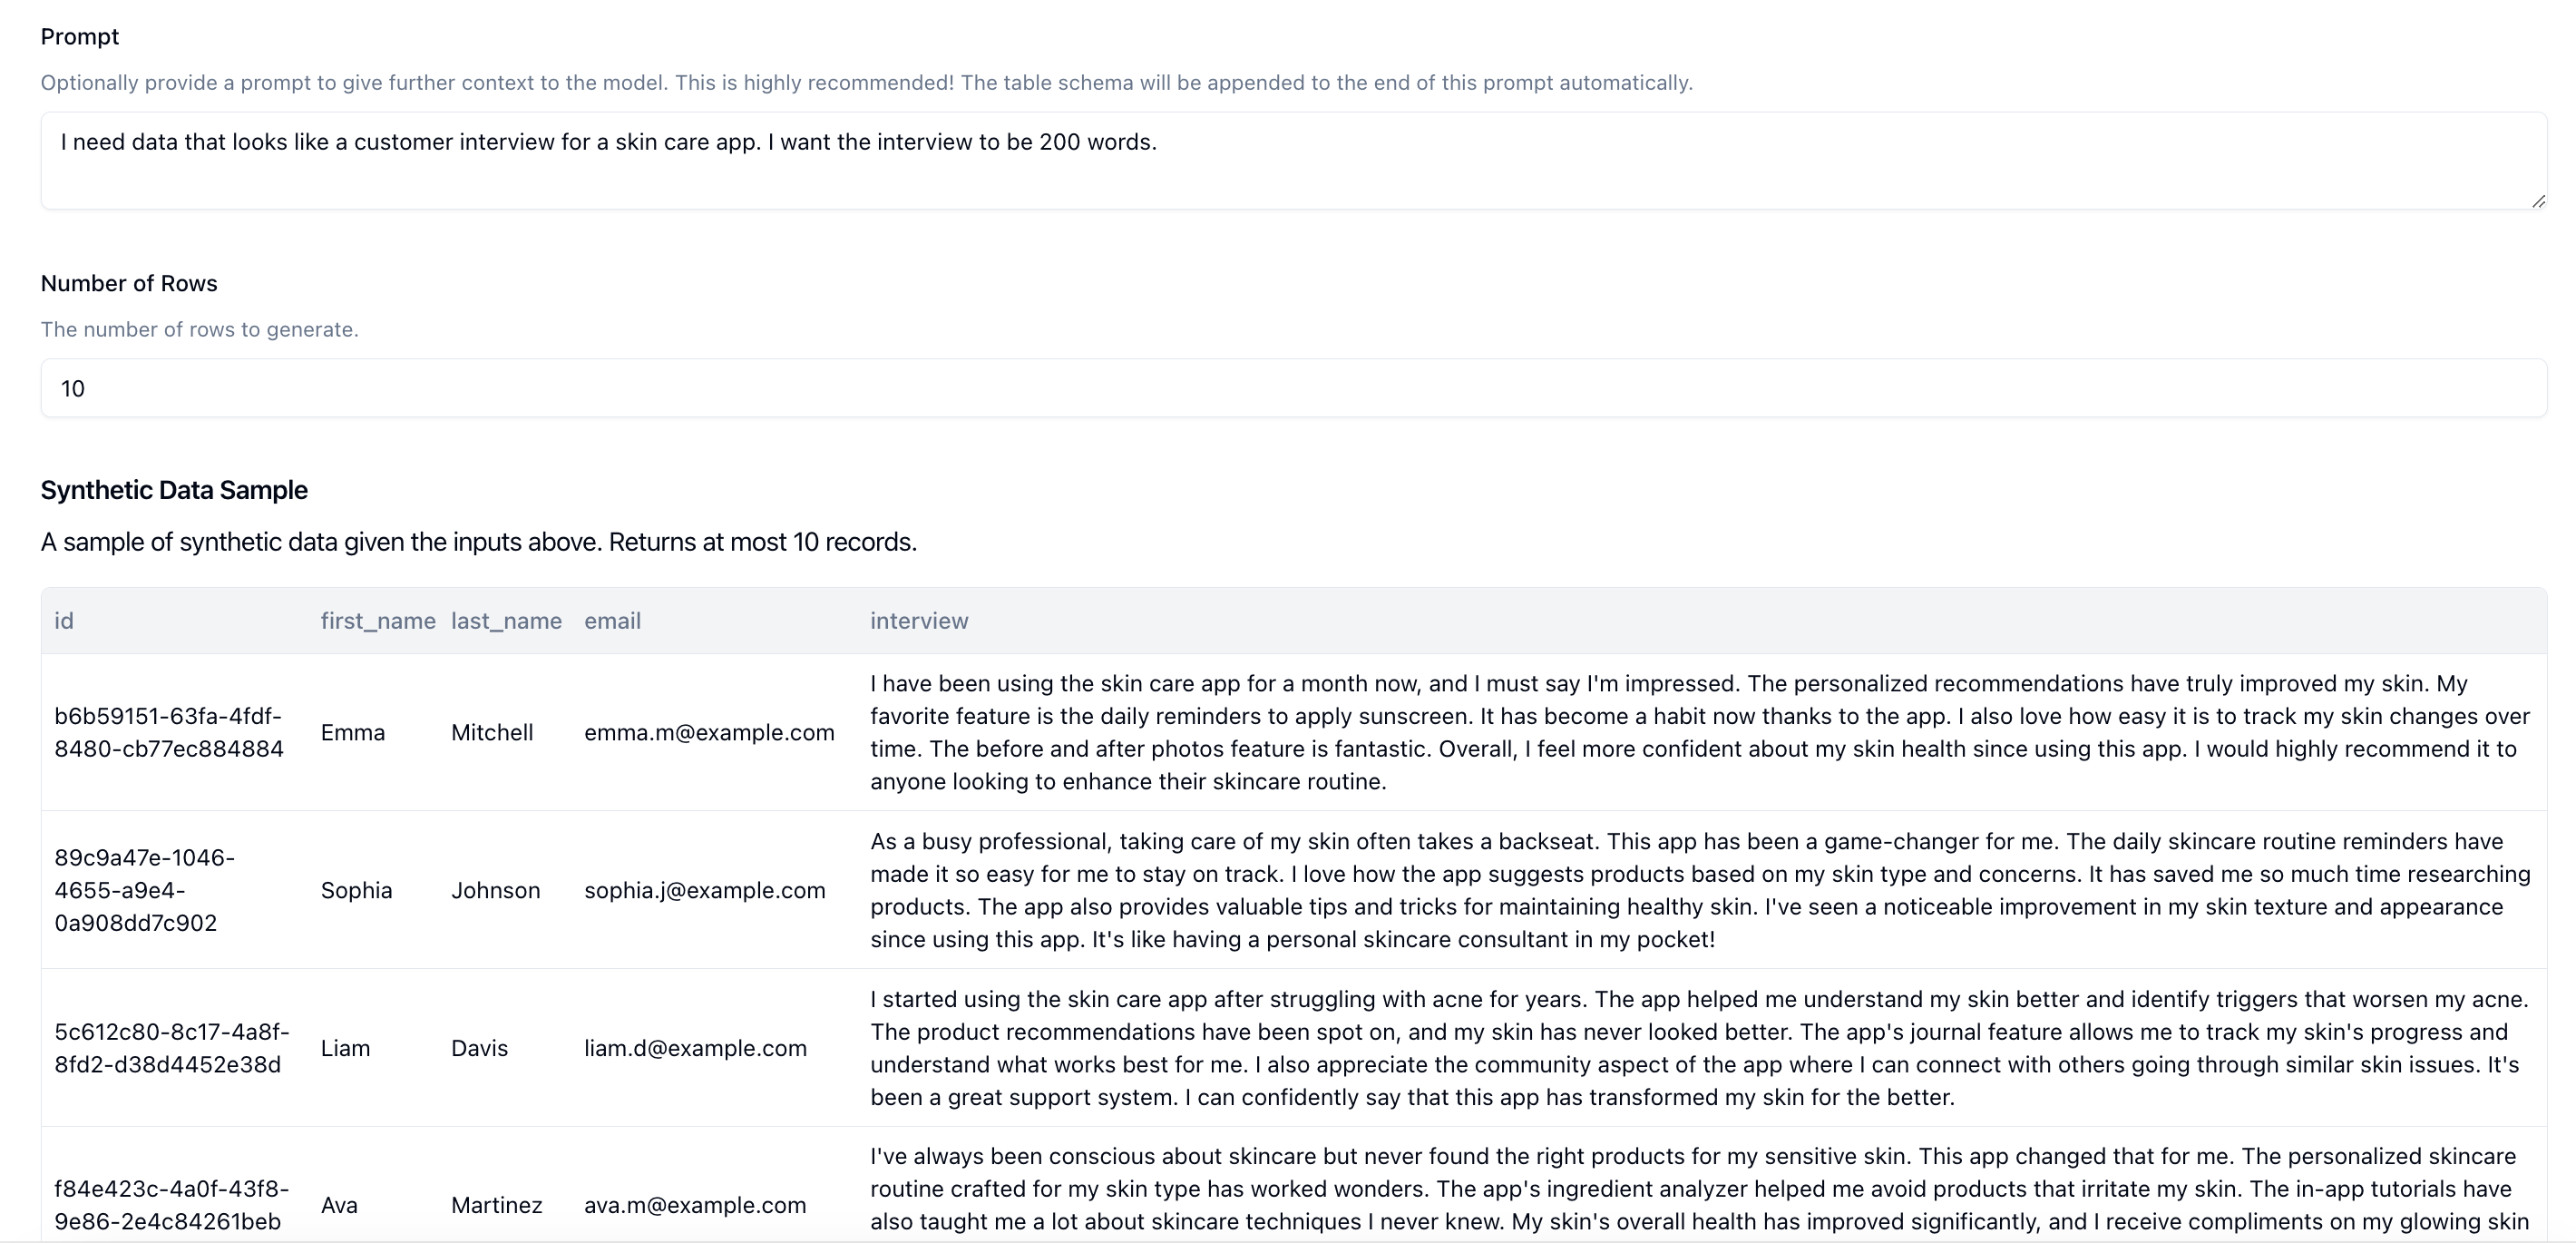
We can provide a prompt in the Prompt input box that describes the type of data you want to generate. For this example, we're going to use the prompt: I need data that looks like a customer interview for a skin care app..
Then we can click on Sample. This makes a call to the LLM using your schema and prompt and returns 10 rows that fits your schema. This is what we get back.
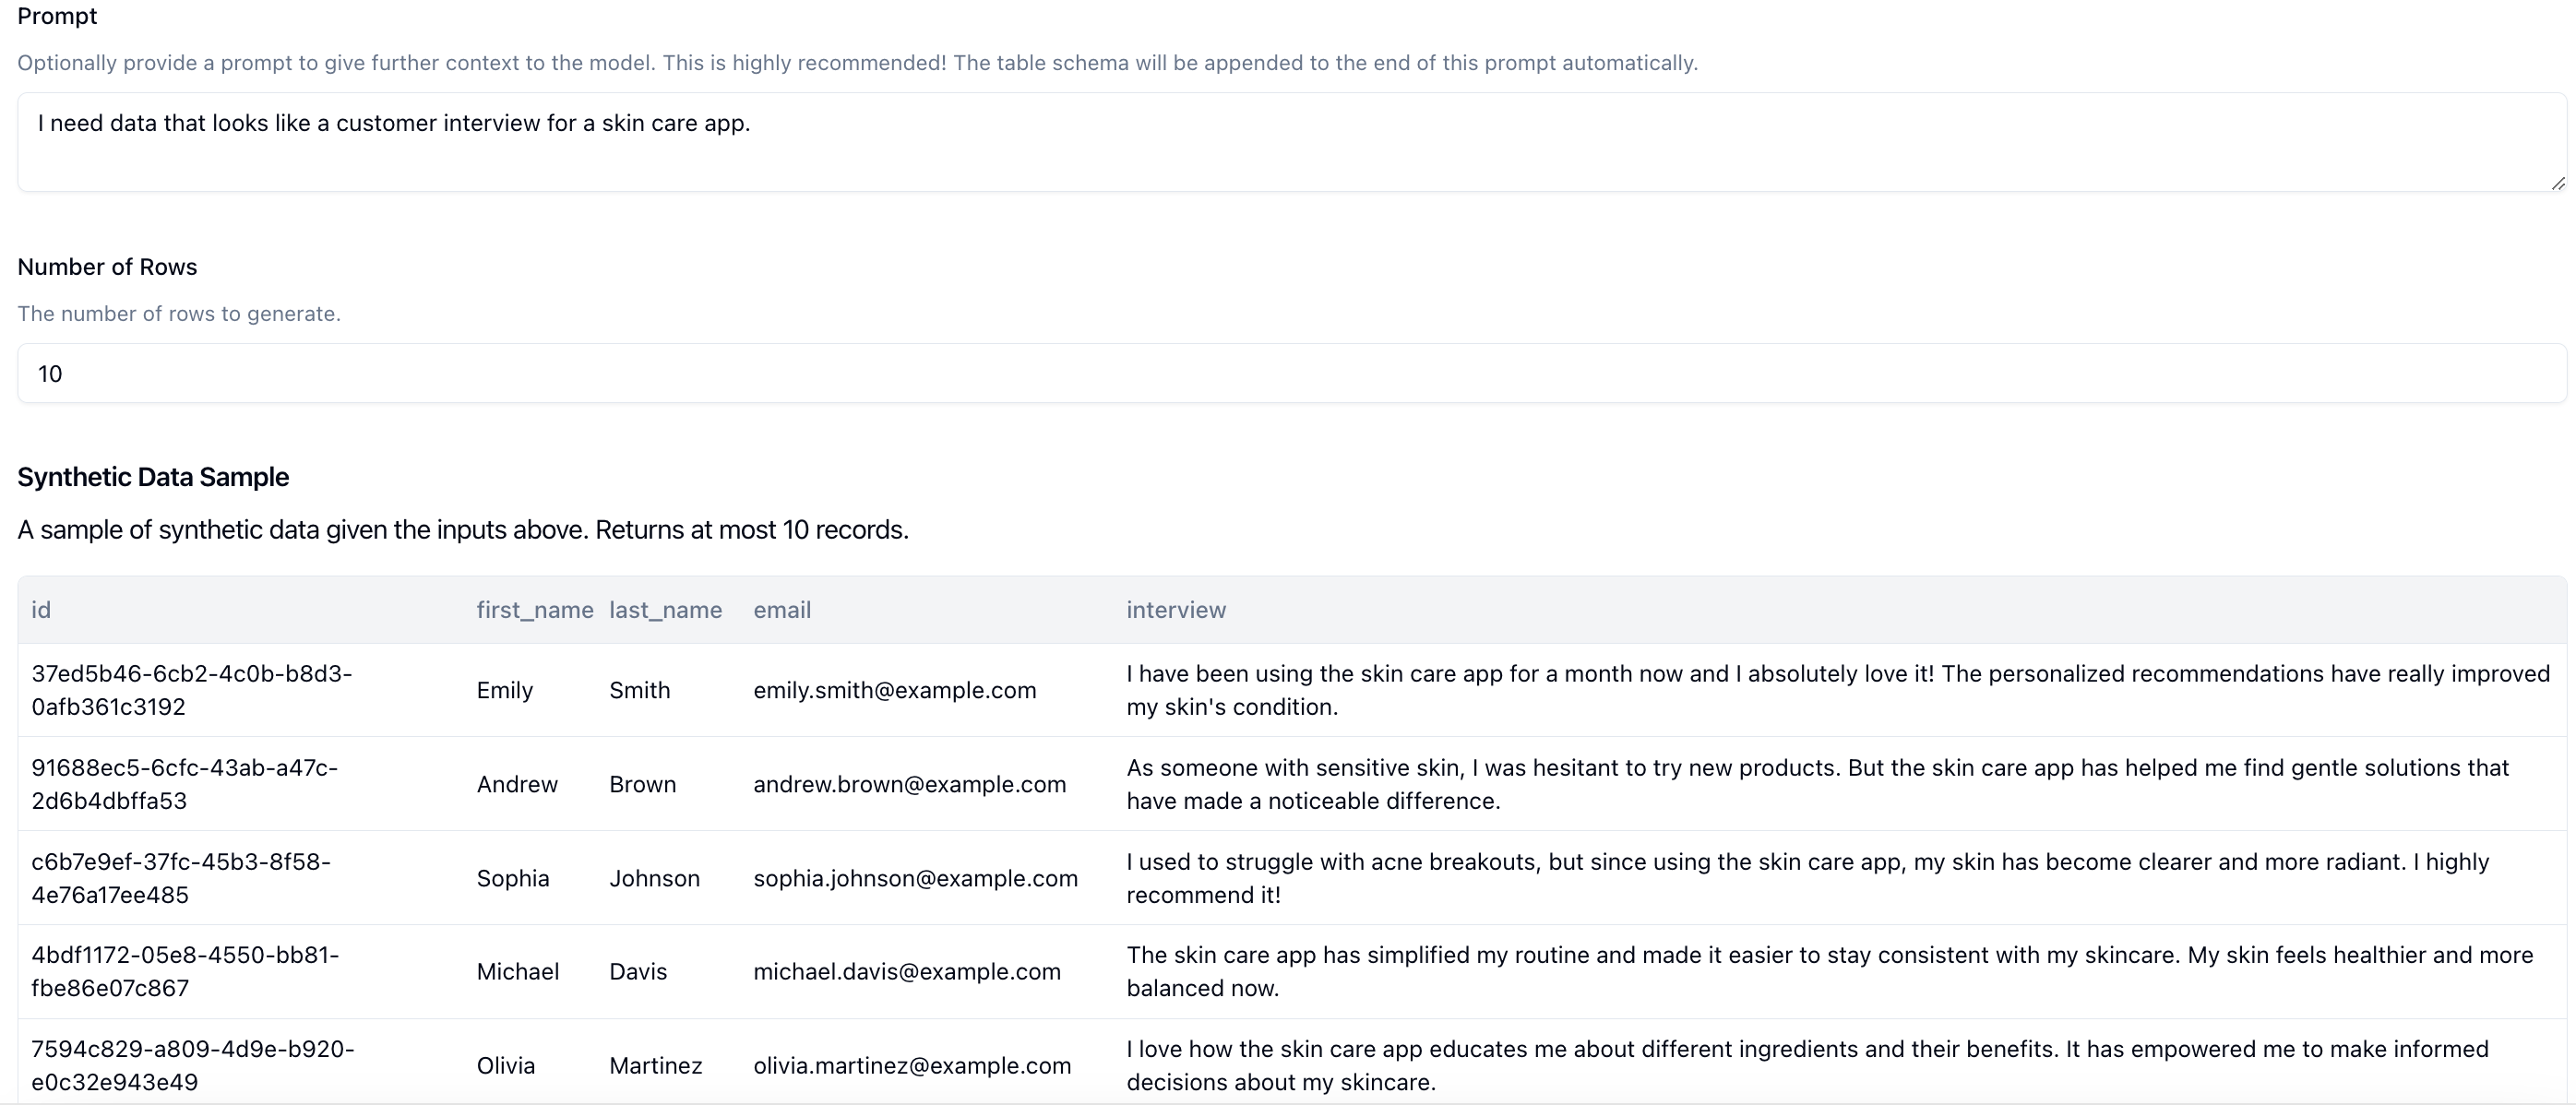
This looks pretty good, but I want the interviews to be a little longer. Let's update our prompt to I need data that looks like a customer interview for a skin care app. I want the interview to be 200 words.. Let's click on Sample and check again.
Much better. We have a little bit of longer interviews to work with. We can continue doing this as many times as we need until we're happy with the final output.
Lastly, set the total number of records that you want. We support up to 1000 records today. Once you're ready, click on Submit to create the job.
And we're done creating the job!
Checking the output
Now is the fun part. We can open up our database and see what our data looks like.
SELECT * FROM public.candidates c limit 10
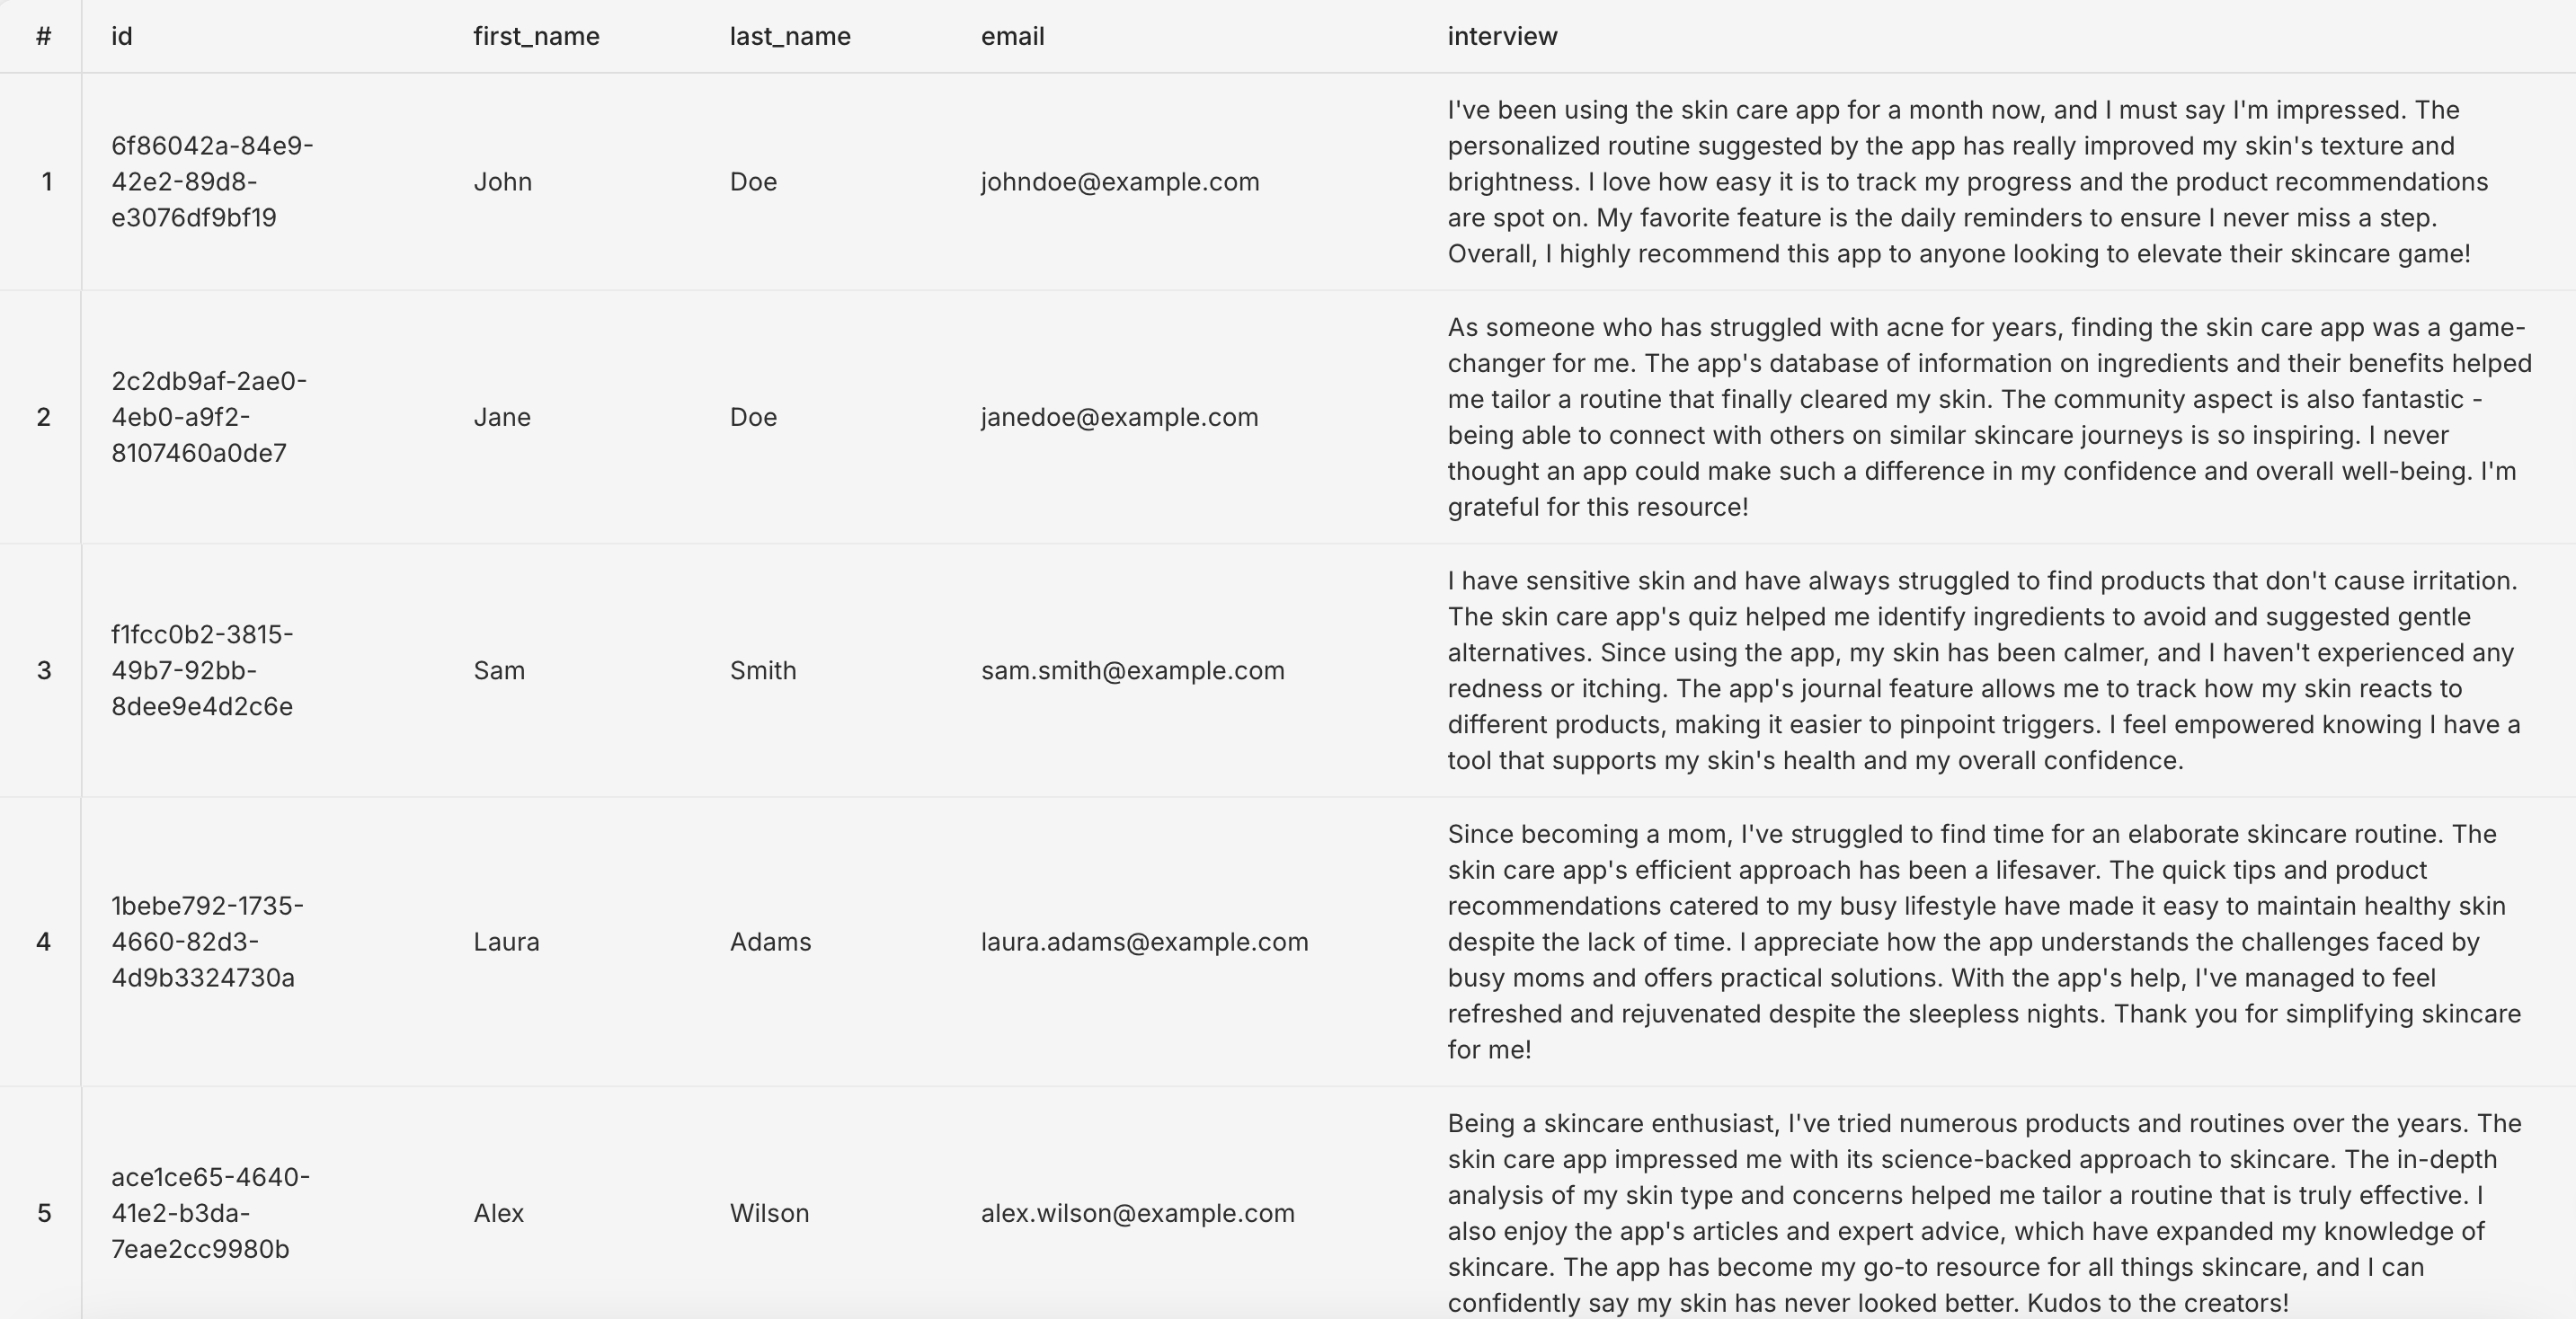
We have our IDs, first names, last names and emails. All looks good so far. Our interview column also looks filled out which is great. Let's take a closer look at one of the transcripts:
I've been using the skin care app for a month now, and I must say I'm impressed. The personalized routine suggested by the app has really improved my skin's texture and brightness. I love how easy it is to track my progress and the product recommendations are spot on. My favorite feature is the daily reminders to ensure I never miss a step. Overall, I highly recommend this app to anyone looking to elevate their skincare game!
This looks pretty realistic!. Also, we can just do a quick scan and see that the interviews are all different and not a copy and paste which is great.
Conclusion
There is a lot more that we can do here and we will continue to expand on this as we build out more features and support. Let us know if you have any feedback!